A chap called Kevin posted a comment on a previous posting of mine asking
did you ever come across anything that could be used to change the LDAP server settings from a command line (admintool.exe, UDML, or otherwise)?
I did a quick play around with some UDML and it appears that you can.
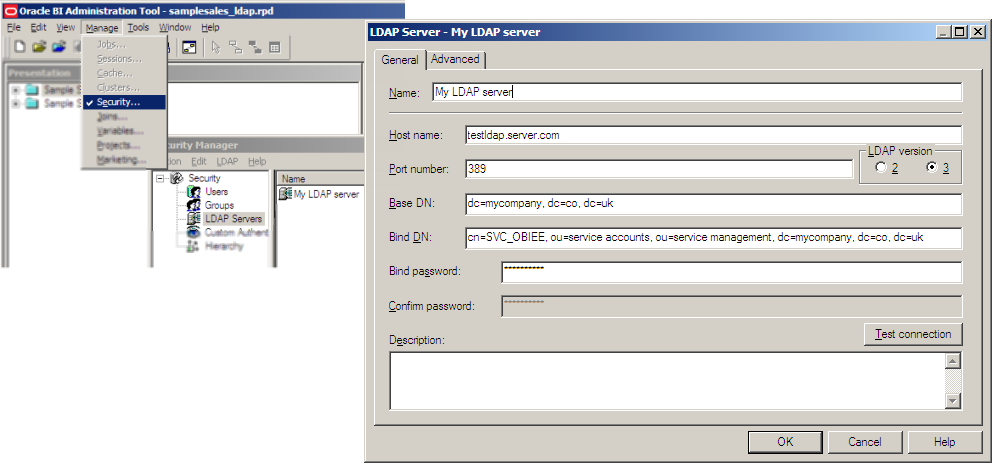
Set up the initial LDAP server definition in the RPD 🔗
First I added a dummy LDAP server to samplesales.rpd: 
Then save and close the RPD.
Export the RPD to UDML format, and isolate the LDAP server UDML definition 🔗
Next open up a command prompt and run the following, which will export the UDML for the whole RPD: [sourcecode] c:\oraclebi\server\bin\NQUDMLGen.exe -U Administrator -P Administrator -R c:\oraclebi\server\repository\samplesales.rpd -O c:\scratch\udml.txt [/sourcecode] 
Open up the generated UDML in your favourite text editor. In the above example, it will have been written to c:\scratch\udml.txt.
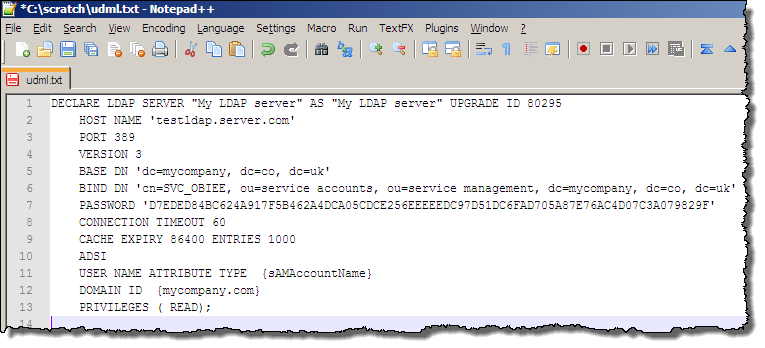
Do a search for the name of your LDAP server, and you should hopefully find a line like this: [sourcecode] DECLARE LDAP SERVER “My LDAP server” AS “My LDAP server” UPGRADE ID 80295 [/sourcecode]
What you do now is remove all the rest of the RPD UDML, so cut from the beginning of the file up to the DECLARE LDAP SERVER, through to the next DECLARE statement. You should end up with something like this: 
Make the required LDAP server change in the UDML 🔗
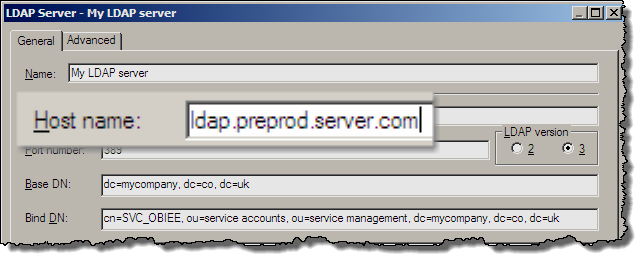
On a copy of the UDML extracted above, make the required changes to the LDAP server definition. For this example, let’s imagine we’re moving the RPD to use a pre-production LDAP server. In a copy of the original udml.txt file, now called ldap_preprod.udml, I’ve simply amended the HOST NAME field: [sourcecode] HOST NAME ’ldap.preprod.server.com’ [/sourcecode] Save the changed file (ldap_preprod.udml in my example).
Apply the LDAP server change to the RPD 🔗
Back at the command line, and this time NQUDMLExec [sourcecode] c:\OracleBI\server\Bin\nQUDMLExec.exe -U Administrator -P Administrator -I c:\scratch\ldap_preprod.udml -B c:\OracleBI\server\Repository\samplesales.rpd -O c:\OracleBI\server\Repository\samplesales.preprod.rpd [/sourcecode]
This applies the UDML in the file specified by “-I” (c:\scratch\ldap_preprod.udml) to be applied to “-B” base repository file (c:\OracleBI\server\Repository\samplesales.rpd) and write the output to “-O”, a new repository file (c:\OracleBI\server\Repository\samplesales.preprod.rpd). 
Open up the new RPD in Administration Tool and check the results of your handiwork: 
Further reading 🔗
UDML in OBIEE is nothing new, and there are some very good articles to read if you want to understand more about it:
- Andreas Nobbmann: Scripting OBIEE – Is UDML and XML all you need ?
- This is Andreas’ presentation from the RittmanMead BI Forum 2009 - and Andreas is speaking again this year. More information here: http://www.rittmanmead.com/biforum2011/
- Dylan Wan: UDML in Oracle BI Server
- Mark Rittman: Scripting Entries in the Oracle BI Repository
- Venkat: UDML to automate repository Updates – Migration of Repositories from Development to Test/Production Environment
- Daan Bakboord: UDML – Scripting
- Andreas Nobbmann: Finding everything in your OBIEE repository - parsing your UDML
Footnote 🔗
All this can be done on Unix too, just make sure you have set your OBIEE environment first with sa-init.sh (or sa-init64.sh) before calling nqudmlgen / nqudmlexec
Whether Windows or Unix, make sure you work on a copy of your RPD, because you might corrupt it otherwise. I’m pretty sure some UDML hacking is unsupported, so use this at your own risk. And did I mention, work on a copy of your files and take backups.
From a note that I wrote last year it looks like UDML is on its way out and an XML-based version on its way in for OBIEE 11g.
The code snippets assume that you have OBIEE installed to c:\OracleBI - amend the path as necessary if you have it elsewhere. You’ll always find NQUDMLGen & NQUDMLExec in
