| This post originally appeared on the Decodable blog. |
So you’ve built your first real-time ETL pipeline with Decodable: congratulations! Now what?
Well now comes the bit that those cool kids over in the SRE world like to call “GitOps,” “Infrastructure as Code” (IaC), or will talk about “shift left.” In more formalised terms, it’s about being a grown-up and adopting good practices of Software Development Lifecycle (SDLC). This is all about taking what you’ve built and handling it as we would with any other software artifact, including:
-
putting it in source control
-
optionally, continuous integration (CI) to the main development environment
-
optionally, continuous deployment (CD) to production
This is where declarative resource management comes in. A core part of Decodable CLIs capabilities, it takes the approach of declaring in a YAML document the resources that should be present, and Decodable figures out how to make it so. Contrast this to imperatively, in which you are responsible for specifying each resource and orchestrating the order of deployment.
For example, to create a sink connection, you’d need the stream from which it reads to exist first. In a declarative world, you create a YAML document that specifies the stream and the sink, and Decodable figures out the rest. Done imperatively, you wouldn’t be able to create the sink until the stream existed—which if you’re doing this by hand may be fine, but as soon as you start to try and script it the dependencies start to get complicated pretty quickly.
So as we’re going to see, declarative resource management enables you to tightly integrate Decodable with industry best-practice IaC/GitOps strategies. It also has further uses, including:
-
Bulk administration tasks—such as removing all connections that match a particular pattern, perhaps that connect to a server that’s been decommissioned.
-
Replicating resources from one Decodable environment to another. This could be to template parallel sandbox environments for multiple developers, or to manually deploy changes to an environment if full CI/CD isn’t in place.
-
Ad-hoc development—some developers will simply prefer to interact with Decodable declaratively rather than imperatively.
What does declarative resource management look like? 🔗
Let’s say we’d like to create a connection. Since we’re thinking declaratively instead of imperatively we create a YAML file that defines the state that we’d like our Decodable account to be in:
---
kind: connection
metadata:
    name: datagen-envoy-01
    description: "An example of how neat declarative resource management is :)"
spec_version: v1
spec:
    connector: datagen
    type: source
    stream_name: envoy
    schema_v2:
        fields:
            - kind: physical
              name: message
              type: STRING
        constraints: {}
    properties:
        delay: "1000"
        format: json
        data.type: envoy
---
kind: stream
metadata:
    name: envoy
spec_version: v1
spec:
    schema_v2:
        fields:
            - kind: physical
              name: message
              type: STRING
Now we apply this resource definition:
$ decodable apply datagen01.yaml
---
kind: stream
name: envoy
id: bc1934c6
result: unchanged
---
kind: connection
name: datagen-envoy-01
id: a2c30b8c
result: created
And thus it is so:
❯ decodable connection list
id name connector type state create time update time
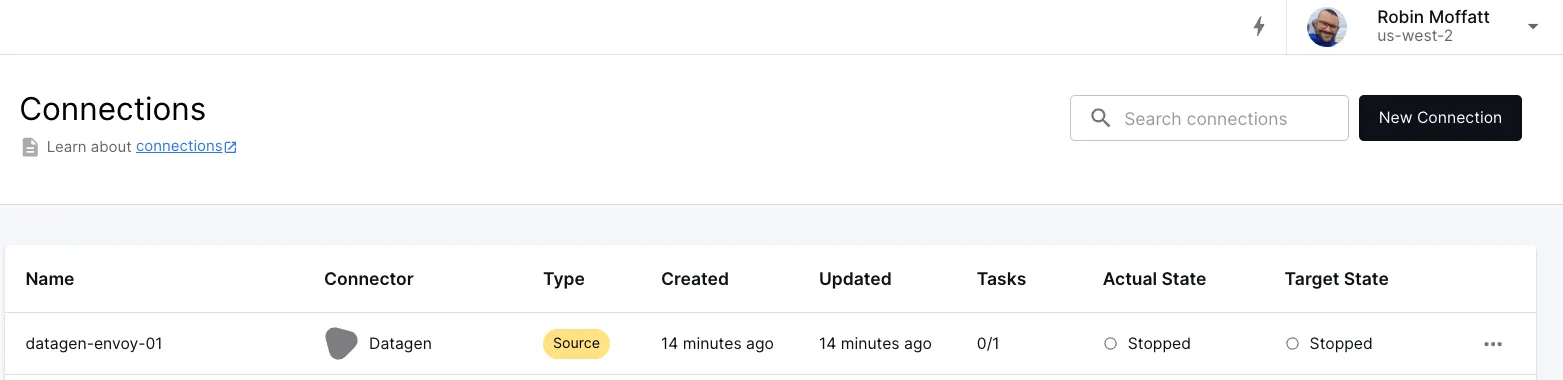
a2c30b8c datagen-envoy-01 datagen source STOPPED 2024-07-25T09:24:32Z 2024-07-25T09:24:32ZWe can see the same thing through the Web UI, if you prefer:
🍅 You say tomato, I say potato? 🥔 🔗
So now contrast the above to the imperative approach.
Here we tell Decodable what to do.
From the CLI this would be to run a decodable connection create […] command.
Pretty much the same thing?
Well, no.
Because when we run this we see the problem straight away:
$ decodable connection create \
      --name datagen-envoy-01 \
      --type source           \
      --connector datagen     \
      --prop delay=500        \
      --prop format=json      \
      --prop data.type=envoy  \
      --field message="STRING"
Error: 409: Resource name [datagen-envoy-01] is already in use by another resource of the same type
Because we’ve said do this thing, the Decodable CLI has gone and created the connection. Or rather, tried to—and failed, because it exists already (since we already created it above).
If this was part of a deployment script we’d now have a failure to deal with. Did we expect the connection to exist? Are we trying to update it and need to delete it first? What if it’s already running? All of this would fall to us to figure out and code around for the different eventualities. Instead, by working declaratively, we’re instead saying we want this thing to be in this state and Decodable then figures out how to make it so.

This may seem somewhat contrived for a single connection—but you’ll very quickly see how it becomes not just beneficial, but essential.
A good example of this difference is making a change to an existing connection. The connection that we created uses a datagen connector , with configuration telling it to simulate Envoy access logs generated every 500 milliseconds._ _Let’s say we want to change that interval to 1000 milliseconds.
Done declaratively, we update the value for delay in our datagen01.yaml file.
Since we just dealing with text files, we can even just express this as a diff:
@@ -15,6 +15,6 @@ spec:
type: STRING
constraints: {}
properties:
- delay: "500"
+ delay: "1000"
format: json
data.type: envoy
and then we apply the file again, just as before:
$ decodable apply connection01.yaml
---
kind: stream
name: envoy
id: bc1934c6
result: unchanged
---
kind: connection
name: datagen-envoy-01
id: a2c30b8c
result: updated
Note that it’s exactly the same command that we ran before.
If we want to do this imperatively, we need to do this:
# See if the connection already exists
$ decodable connection list | grep datagen-envoy-01
a2c30b8c  datagen-envoy-01                   datagen       source  STOPPED  2024-07-25T09:24:32Z  2024-07-25T09:43:24Z

# Get the id of the connection
$ id=$(decodable connection list | grep datagen-envoy-01 | cut -d ' ' -f 1) && echo $id
a2c30b8c

# Delete the connection
$ decodable connection delete $id
Deleted connection a2c30b8c

# Recreate the connection with the changed interval value
$ decodable connection create \
      --name datagen-envoy-01 \
      --type source           \
      --connector datagen     \
      --prop delay=1000       \
      --prop format=json      \
      --prop data.type=envoy  \
      --field message="STRING"
Created connection datagen-envoy-01 (4c7c2c7d)
…and that’s before we get onto any kind of error handling, logic branching (we’re assuming that the connection does exist, but if it doesn’t we need to skip the deletion, etc), execution control (for example, we can’t delete a running connection, so we’d have to stop it first).
Storing Decodable resources in source control 🔗
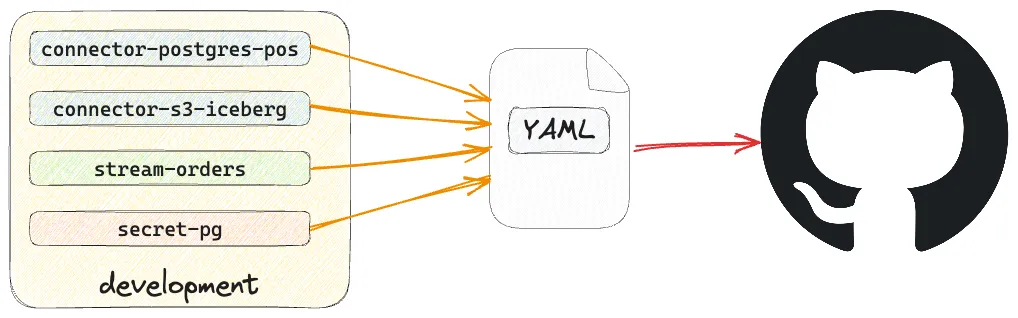
You may have spotted that the YAML file we created above to define the connection is perfectly suited to storing in source control.

Just as any software engineer worth their salt these days wouldn’t dream of not storing their code in a source control tool such as git, the same should be true in the world of data engineering.
The definition of pipelines and connections is our version of ‘code’, and being able to store it in source control is important.
It’s part of a broader adoption of Infrastructure as Code (IaC), with popular examples including Terraform, and Kubernetes’ kubectl tool.
How you curate your resources is a matter of personal preference and organizational standards. You might decide that the connection and its stream are one logical unit and store it as such (as shown in the example above):
git add datagen01.yaml
git commit -m "Datagen connection for envoy, plus envoy stream"
You could alternatively split resources into individual files, which would make a git diff easier to read particularly with a larger number of objects:
git add c_datagen-envoy-01.yaml
git commit -m "Datagen envoy connection"
git add s_envoy.yaml
git commit -m "Envoy stream"
Or put different resources in their own folders:
$ tree .
.
├── connection
|   └── c_datagen-envoy-01.yaml
└── stream
    └── s_envoy.yaml
The Decodable CLI will take one or more yaml files as input, so however you arrange them, the declarative resource management remains the same in use:
# Individual resource files
decodable apply c_datagen-envoy-01.yaml s_envoy.yaml
# Resource folders
decodable apply connection/* stream/*
Resources in Decodable
If you’re used to using Decodable through the web interface you may not have come across the concept of resource types before, or given them much thought. When working with declarative resource management in Decodable it’s important to understand the four resource types and how they interact: * Streams - unbounded series of data, similar in concept to a topic in Apache Kafka * Connections - source or sink for getting data from and to external systems * these write to, or read from, streams * read secrets for authentication to external systems
-
Pipelines - transform data. Can be written in SQL or as Flink jobs (known as Custom Pipelines)
-
these write to, or read from, streams
-
Secrets - hold sensitive values such as passwords
-
used in connections (and also available to Custom Pipelines through the Decodable SDK )
Handling secrets 🔗
There’s one important part that we’ve not covered yet that’s going to be relevant here, and that’s how secrets are dealt with. These are used to store authentication details that are used by connections and pipelines. Secrets are useful for two key reasons: they avoid having to hard-code sensitive information, and they enable seamless movement between environments since the authentication details will (hopefully) be different.
Secrets are a resource defined in YAML just like a connection, but they have a special way of specifying their value. You can provide the value as a reference to an environment variable, or the contents of a file. You can also hardcode it…but you almost certainly don’t want to do that!
Here’s an example of a snippet of a connection resource definition referencing a secret:
---
kind: connection
metadata:
    name: customers-source
spec_version: v1
spec:
    connector: postgres-cdc
    type: source
    properties:
        hostname: my-pg-host.acme-corp.com
        username: etl_ro_user
        password: etl-ro-secret
[…]
Whilst etl_ro_user is the literal value of the user that will authenticate to Postgres (in this example), etl-ro-secret is a reference to a secret of that name.
Its definition might look like this:
---
kind: secret
metadata:
    name: etl-ro-secret
spec_version: v1
spec:
    value_env_var: ETL_PW
When this is used, the Decodable CLI will fetch the value of the environment variable ETL_PW and set this as the secret in Decodable.
Here’s what it looks like in action:
# With no environment variable set, the apply command will fail
$ echo $ETL_PW

$ decodable apply etl-ro-secret.yaml
Error: secret [etl-ro-secret] has spec.value_env_var [ETL_PW] but that environment variable is not set

# Set a value for the environment variable
$ export ETL_PW=hunter2
$ decodable apply etl-ro-secret.yaml
---
kind: secret
name: etl-ro-secret
id: 3554ef3b
result: created
• Wrote plaintext values for secret IDs: [3554ef3b]
CI/CD 🔗
With our code in source control, the next step on our GitOps journey is to automate its deployment. The Decodable CLI can be run as part of a GitHub Actions workflow . Common patterns that you might look to adopt here would be:
-
Staging/Integration: Commit the resource YAML files in a feature branch. When you merge this into the shared development branch of your repository a workflow runs to deploy the resulting set of resources to a shared development or staging environment for integration/smoke testing.
-
Production release When you merge into the production branch, a workflow runs to update the production Decodable environment to reflect the resources defined in the production branch of source control.
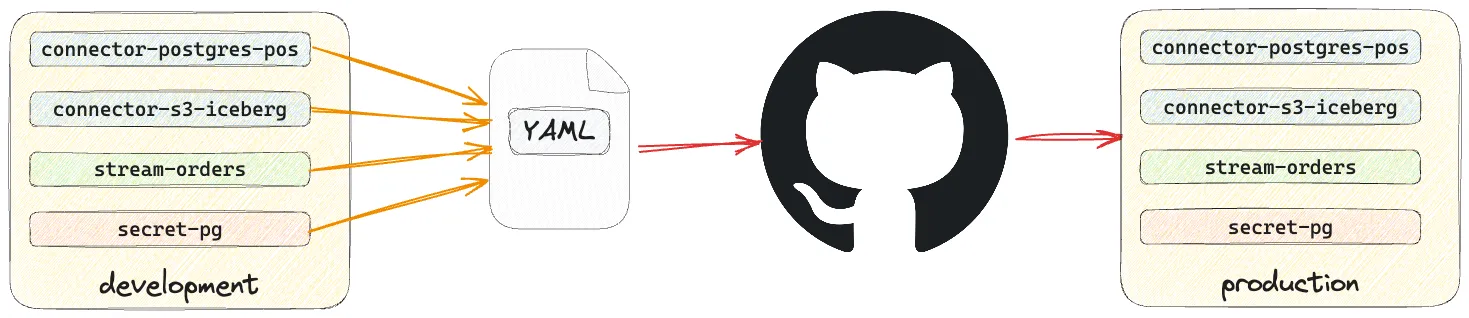
A workflow for deployment to production might look something like this:
name: Deploy Decodable resources
on:
  push:
    branches:
      - main
    paths:
      - 'decodable/**' # only trigger if changes have been made under the decodable folder
jobs:
  apply_decodable_resources:
    name: Apply Decodable Resources
    runs-on: ubuntu-22.04
    steps:
      - name: Install dependencies
        run: |
          apt-get update && apt-get install -y curl
      - name: Generate the authentication token for Decodable CLI
        env:
          DECODABLE_CLI_CLIENT_ID:     ${{ secrets.DECODABLE_CLI_CLIENT_ID }}
          DECODABLE_CLI_CLIENT_SECRET: ${{ secrets.DECODABLE_CLI_CLIENT_SECRET }}
        # See https://docs.decodable.co/cli/integrate-with-github-actions.html
        run: ./store-auth.sh
      - name: Checkout repository
        id: checkout_repo
        uses: actions/checkout@v4
      - name: Install Decodable CLI
        run: |
          curl https://releases.decodable.co/decodable-cli/linux/amd64/decodable-cli-linux-amd64-1.17.0.tar.gz -O
          tar xf decodable-cli-linux-amd64-1.17.0.tar.gz
          mv decodable-cli-linux-amd64-1.17.0/bin/decodable /usr/local/bin/
      - name: Apply all the resources under the decodable folder
        env:
          ETL_PW: ${{ secrets.ETL_PW }}
        run: |
          find ./decodable -type f \( -name "*.yml" -o -name "*.yaml" \) -print0 | \
          xargs -0 decodable apply
This uses the approach described in the documentation to configure authentication for your Decodable account, and then invokes decodable apply with every YAML file under ./decodable as an argument.
The value for secrets (just one shown here, called ETL_PW) is set via an environment variable from a GitHub secret .
The excellent thing about declarative resource management is that if nothing has changed in the resource definition then no change will be made to the resource on Decodable. This means that you can pass the whole set of resource definitions without worry about them getting dropped and recreated, because they’re simply left alone unless there is a change to make. For example:
$ find declarative -type f \( -name "*.yml" -o -name "*.yaml" \) -print0 | \
    xargs -0 decodable apply
---
kind: stream
name: envoy
id: bc1934c6
result: created
---
kind: connection
name: datagen-envoy-01
id: 4c7c2c7d
result: created
---
kind: secret
name: etl-ro-secret
id: 3554ef3b
result: created
It’s also worth pointing out that the execution intent is also part of the resource definition. What’s that mean? It means that the execution state of a connection or pipeline—whether it should be active, and the task size and count to run the job if so—is dictated through the declarative process. After applying a set of YAML files, resources that were running and should be will still be running. Those that aren’t that should be, perhaps if they’ve just been created, will then be run.
Creating YAML files 🔗
So far, I’ve shown you a lot of existing YAML files and how these can be used to declare the resources that should exist on the target Decodable account. But how are these YAML files created?
One option is to lovingly craft them by hand, following the documented spec . That’s fine if writing raw YAML is your thing. Quite possibly though, you’ll want to get the definition of existing resources on your Decodable account. This could be so that you can then modify it to suit the definition of a new resource (and it’s quicker than writing it from scratch). But this is also a great way to quickly get a dump of some, or all, your resources in a form that you can then put into source control (like we saw above).
+
+ This then provides a very efficient workflow of creating new resources: you first can define new connections and pipelines using the web UI, exploring and defining all their options, and then export them as a declarative resource, so you can put them into revision control, apply them in other environments, etc.
At its simplest invocation, the decodable query command returns all information about all resources:
$ decodable query
---
kind: connection
metadata:
    name: datagen-envoy-01
    description: An example of how neat declarative resource management is :)
spec_version: v1
spec:
    connector: datagen
    type: source
    stream_name: envoy
    schema_v2:
        fields:
            - kind: physical
              name: message
              type: STRING
        constraints: {}
    properties:
        delay: "1000"
        format: json
        data.type: envoy
status:
    create_time: 2024-07-25T09:48:37.663+00:00
    update_time: 2024-07-25T13:49:48.482+00:00
    target_state: STOPPED
    actual_state: STOPPED
    requested_tasks: 1
    actual_tasks: 0
---
kind: connection
metadata:
    name: iceberg-basket_agg
    description: ""
spec_version: v1
[…]
You’ll notice a status field there—useful for runtime details, but not if we’re putting it into source control.
The query command provides an option specifically for this: --export:
$ decodable query --export
---
kind: connection
metadata:
    name: datagen-envoy-01
    description: An example of how neat declarative resource management is :)
spec_version: v1
spec:
    connector: datagen
    type: source
    stream_name: envoy
    schema_v2:
        fields:
            - kind: physical
              name: message
              type: STRING
        constraints: {}
    properties:
        delay: "1000"
        format: json
        data.type: envoy
---
kind: connection
metadata:
    name: iceberg-basket_agg
    description: ""
spec_version: v1
[…]
Since it’s YAML that’s output, you can just redirect this into a target file, and then you have a file ready to be run with decodable apply:
decodable query --export > decodable-resources.yamlWhat about if you don’t want all of the resources returned by the query?
A rich set of filter options is available, such as --name, --kind, and more:
decodable query --name datagen-envoy-01
---
kind: connection
metadata:
    name: datagen-envoy-01
    description: An example of how neat declarative resource management is :)
spec_version: v1
spec:
    connector: datagen
    type: source
    stream_name: envoy
    schema_v2:
        fields:
            - kind: physical
              name: message
              type: STRING
        constraints: {}
    properties:
        delay: "1000"
        format: json
        data.type: envoy
status:
    create_time: 2024-07-25T09:48:37.663+00:00
    update_time: 2024-07-25T13:49:48.482+00:00
    target_state: STOPPED
    actual_state: STOPPED
    requested_tasks: 1
    actual_tasks: 0
You can also do some neat stuff using yq to post-process the YAML, giving you even more flexibility. Here’s an example of getting the resource definitions for all connections that use the Kafka connector:
decodable query --export --kind connection | \
    yq eval-all 'select(.spec.connector=="kafka")'
Copying resources between environments 🔗
It might have occurred to you by now that if the decodable query command returns YAML that’s consumable by decodable apply, this could be a nice way to copy resources between environments—and you’d be right!
You can configure multiple profiles in the Decodable CLI.
For each one, make sure you run a decodable login.
Let’s imagine my default profile is for my development environment, and I want to copy across some resources to the staging environment.
First up, I’ll make sure I’m authentication to it:
decodable login --profile stagingNow I can copy resources from my default profile to the staging one:
decodable query --name datagen-envoy-01,envoy --export | \
    decodable apply - --profile staging
---
kind: stream
name: envoy
id: a0567f3e
result: created
---
kind: connection
name: datagen-envoy-01
id: cdf9dfb2
result: created
Note the use of the – to tell the apply command to read from stdin.
Now I have the connection and stream in my staging environment:
decodable query --metadata-only --profile staging
---
kind: stream
metadata:
    name: envoy
---
kind: connection
metadata:
    name: datagen-envoy-01
    description: An example of how neat declarative resource management is :)
Of course, it’d probably be better practice to write the resource YAML to a file that’s getting committed to source control, and from there applied to the target Decodable environment. But for quick ad-hoc resource migration, this works just great.
Templating Resources 🔗
Another advantage of declarative resource management in Decodable is that it makes it easy to use templating to apply many resources of similar but slightly varying definitions. For example, you might have multiple Postgres databases which are logically identical but split across geographical locations. You want to set up each one as a connection in Decodable.
One option is you copy and paste 98% of the same content each time and hard code a set of files that are almost-but-not-quite the same:
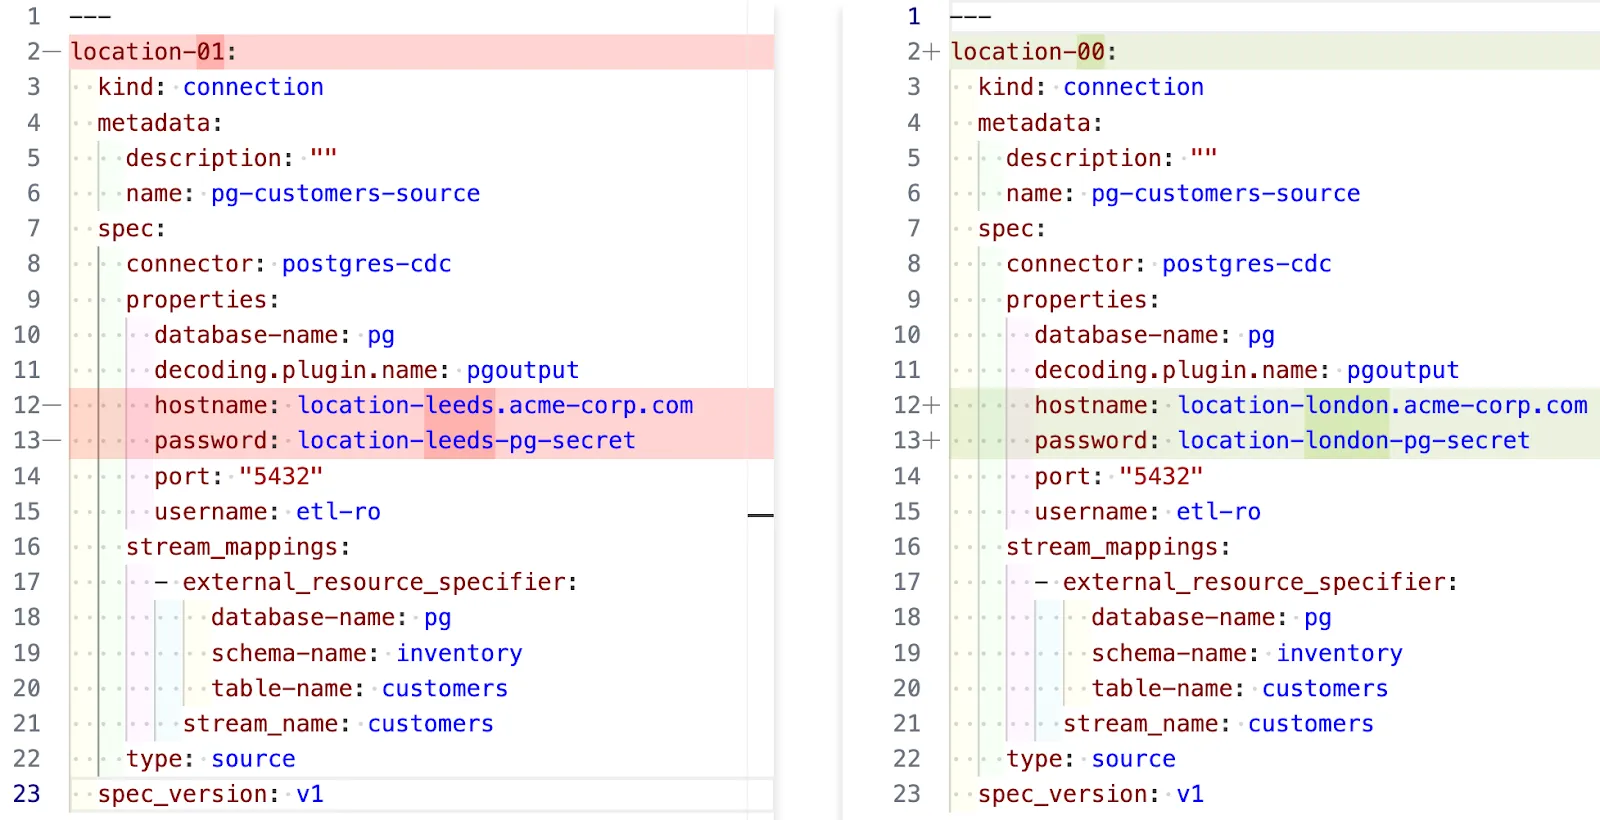
You now have a bunch of files to manage, all of which need updating if something changes.
The better option here is to template it and generate the YAML dynamically.
Tools that are commonly used for this include jsonnet and kustomize .
Here’s an example with jsonnet.
First we create the template connection in a function called makeConnection:
local makeConnection(location) = {
 kind: "connection",
 metadata: {
   name: "pg-customers-source-" + location,
   description: "",
 },
 spec_version: "v1",
 spec: {
   connector: "postgres-cdc",
   type: "source",
   stream_mappings: [
     {
       stream_name: "customers",
       external_resource_specifier: {
         "database-name": "pg",
         "schema-name": "inventory",
         "table-name": "customers",
       },
     },
   ],
   properties: {
     hostname: "location-" + location + ".acme-corp.com",
     password: "location-" + location + "-pg-secret",
     port: "5432",
     "database-name": "pg",
     "decoding.plugin.name": "pgoutput",
     username: "etl-ro",
   },
 },
};
and then in the same file invoke that function for the list of locations for which we want to create connections:
local locations = [
 "london",
 "leeds",
 "leamington-spa",
 "llandudno"
];

std.manifestYamlStream([
 makeConnection(location)
 for location in locations
])
Now we invoke jsonnet and pass the output through yq to format it as YAML:
jsonnet -S store-connections.jsonnet | yq -P > connections.yamlWith that we have a file of connection resource definitions that we can use with decodable apply, in this case four different connections, one for each location, using a different hostname and connection name for each:
$ grep -E "\sname|hostname" connections.yaml


  name: pg-customers-source-london
    hostname: location-london.acme-corp.com
  name: pg-customers-source-leeds
    hostname: location-leeds.acme-corp.com
  name: pg-customers-source-leamington-spa
    hostname: location-leamington-spa.acme-corp.com
  name: pg-customers-source-llandudno
    hostname: location-llandudno.acme-corp.com
Get started today! 🔗
Declarative resource management in Decodable is, as you’ve seen above, fantastically powerful. Not only does it enable SDLC best-practices such as source control and GitOps, but comes with numerous other uses such as ad-hoc resource management, migration between environments, and even deleting resources.
You can find full details in the documentation . Sign up with Decodable for free today to give it a try.